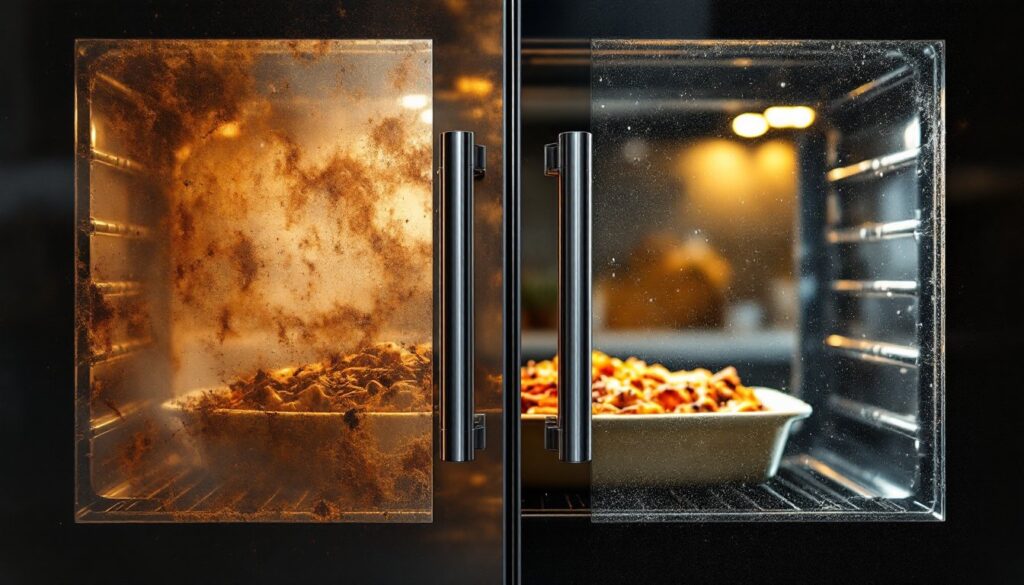

Oven glass is one of those things that starts clear and slowly transforms into an opaque, baked-on mess. One week it’s fine: the next, you’re squinting through layers of burnt-on splatters and grease trying to see if your casserole is golden brown. The good news? Whether you’re dealing with years of buildup or fresh spills, there’s a solution that fits your budget and effort level. This guide walks you through both commercial oven glass cleaners and proven DIY methods, plus maintenance tips to keep that window looking good between deep cleans. Let’s cut through the confusion and get your oven glass sparkling again.
Table of Contents
ToggleKey Takeaways
- Oven glass gets dirty because heat, moisture, and food particles create baked-on deposits that chemically bond to the surface, making regular soap ineffective.
- The best oven glass cleaner for your needs depends on buildup level: use baking soda and vinegar for light maintenance, ammonia for heavy grease, or commercial sprays for minimal effort.
- DIY methods like baking soda paste with vinegar work surprisingly well and cost just pennies, while commercial cleaners ($4–$15) deliver faster results for moderate to heavy deposits.
- Wiping fresh spills immediately while glass is still warm prevents deposits from bonding and is the single most effective maintenance practice.
- A monthly light touch-up with baking soda and water takes just minutes and prevents heavy buildup, eliminating the need for intensive deep cleaning sessions.
- Never mix ammonia with bleach or commercial cleaners, and always ensure proper ventilation when using ammonia-based solutions to avoid toxic fumes and respiratory irritation.
Why Oven Glass Gets So Dirty and Hard to Clean
Oven glass collects grime for a straightforward reason: heat, moisture, and food particles create a perfect storm. When you bake or roast, vapors rise, condense on the cooler glass, and mix with cooking oils and splatters. As these deposits dry and heat cycles repeat, they bond chemically to the glass surface, especially on the interior pane, which sits in the direct heat zone.
The reason it’s hard to clean isn’t just stubbornness: it’s chemistry. Baked-on deposits aren’t just surface dirt. They’re oxidized compounds that have essentially fused to the glass over time. Regular dish soap and water won’t break those bonds. You need either alkaline cleaners (to neutralize acidic burnt food) or acidic cleaners (to cut through grease), or a combination of both. This is why scrubbing alone fails, you’re fighting molecular adhesion, not loose dust.
The interior pane is almost always worse than the exterior because it bears the brunt of oven heat and moisture. The exterior typically just needs regular wiping. Temperature fluctuations on the inner pane also create microscopic cracks in deposits, allowing new splatters to nestle into those crevices, building layers.
The Best Commercial Oven Glass Cleaners for Quick Results
If you want speed and minimal effort, commercial cleaners are purpose-built for this job. The most effective options fall into two categories: aerosol sprays and cream pastes.
Aerosol sprays like Zep Oven and Grill Cleaner or Easy-Off Black Label work fast. Spray, wait 20–30 minutes, then wipe. They contain alkaline surfactants that dissolve grease and soften burnt-on food without requiring elbow grease. The catch? They work best on fresh or moderate buildup. Heavy, years-old deposits may need multiple applications or extended soaking time. Always follow the product’s dwell time, spraying and wiping immediately defeats the chemistry.
Cream pastes like Bar Keeper’s Friend or specialized oven glass pastes cling to vertical surfaces longer, giving the cleaner time to work. Apply, let sit 15–30 minutes, then scrub with a non-scratch pad. These are gentler on glass and give you more control than sprays. Product reviews on CNET and similar tech sites often cover kitchen appliance maintenance, including specific product performance comparisons worth checking before buying.
For stubborn deposits, a two-stage approach works: apply the commercial cleaner, let it sit overnight, then scrub the next morning. The extended contact time lets the chemicals work deeper. Wear gloves and ensure good ventilation, these products emit fumes, and many contain caustic chemicals that’ll irritate skin and lungs. Open a window and avoid breathing fumes directly.
Cost runs $4–$15 per product, and one bottle typically handles multiple cleanings. If you clean monthly, it’s economical.
DIY Oven Glass Cleaning Solutions That Cost Pennies
Not everyone wants commercial chemicals in their kitchen, and frankly, baking soda and vinegar work surprisingly well for moderate buildup. Two proven methods deliver results without harsh fumes or premium pricing.
Baking Soda and Vinegar Method
This is the gentlest and safest approach, though it requires more patience than commercial cleaners.
What you’ll need:
- Baking soda (sodium bicarbonate)
- White vinegar
- Water
- A spray bottle
- A non-scratch scrub pad or soft brush
- Paper towels or rags
Steps:
- Remove loose debris by wiping the glass with a dry cloth.
- Mix baking soda with a small amount of water to form a thick paste (roughly 3 parts baking soda to 1 part water). Adjust consistency until it’s spreadable but not runny.
- Apply the paste directly to the glass, focusing on heavily soiled areas. Let it sit for 15–30 minutes. For stubborn buildup, leave it overnight.
- Spray white vinegar onto the baking soda paste. It’ll fizz, that’s the acid reacting with the base, which helps lift deposits.
- Gently scrub with a non-scratch pad, using circular motions. Avoid steel wool or scouring brushes on glass: they leave marks.
- Wipe clean with a damp cloth, then dry immediately with paper towels to prevent streaks.
Why this works: Baking soda is mildly abrasive and alkaline, so it gently scrubs while neutralizing acidic burnt food. Vinegar’s acetic acid cuts through grease and reacts with baking soda to create a micro-scrubbing action. Together, they’re a surprisingly effective duo, and completely safe around food preparation surfaces.
This method takes 30–60 minutes depending on buildup, but it’s free from fumes and uses ingredients you likely already have. For light monthly maintenance, this is your best bet.
Ammonia and Water Paste
If you want more aggressive cleaning without commercial products, ammonia (household strength, not industrial) is effective and inexpensive.
What you’ll need:
- Household ammonia (usually 5–10% concentration)
- Water
- A bowl
- A non-scratch scrub pad
- Gloves and eye protection
- Ventilation (open a window)
Steps:
- Mix equal parts ammonia and water in a bowl. Stir well.
- Apply the mixture to the glass with a cloth or sponge, covering all soiled areas.
- Let it soak for 20–45 minutes. Longer soak times work on tougher deposits.
- Scrub gently with a non-scratch pad, using small circular motions.
- Rinse thoroughly with clean water and dry immediately.
Important safety notes: Ammonia fumes are stronger than vinegar and can irritate eyes and respiratory passages. Never mix ammonia with bleach or commercial cleaners, this creates toxic chloramine gas. Always wear gloves to protect skin and ensure excellent ventilation. If you feel lightheaded or your eyes burn, stop immediately, leave the area, and get fresh air.
Ammonia cuts through grease very effectively, making it better than baking soda for heavily oiled deposits. But, it requires more caution and isn’t suitable for homes with young children, pets, or occupants with respiratory sensitivity. Cost is roughly $2–$4 per bottle, and a little goes a long way.
According to expert guides on how to clean an oven inside and out, both methods are validated by experienced cleaners as safe and effective alternatives to harsh chemicals.
Pro Tips for Maintaining Clear Oven Glass Between Deep Cleans
Once you’ve invested time in getting the glass clean, don’t let it slide back into a mess. A few preventive habits make the next deep clean much easier.
Wipe fresh spills immediately (or as soon as the glass cools). This is the single best maintenance practice. When grease splatters land on hot glass and then cool, it bonds faster. If you catch it while still warm (not hot enough to burn), a quick wipe with a damp cloth usually removes it before it hardens.
Place a sheet of aluminum foil or an oven liner on the rack below your cooking zone. This catches drips before they hit the glass. It’s not foolproof, but it significantly reduces splatter frequency. Just make sure the liner doesn’t touch heating elements.
Do a light monthly wipe-down with baking soda and water. Mix a thin paste, apply to the glass, let sit for 10 minutes, then wipe clean. This prevents heavy buildup from forming in the first place and takes only a few minutes.
Avoid abrasive scrubbers on routine cleaning. Microfiber cloths and soft sponges are gentler and sufficient for light deposits. Save aggressive scrubbing for deep cleans when necessary.
Use your oven’s self-clean cycle cautiously. Self-cleaning ovens heat to 900°F+, which can cause rapid temperature changes on glass and potentially weaken it over time. If you do use it, ensure the glass is in good condition first (no cracks), and let it cool slowly before opening the door. Resources like The Spruce’s home improvement guides often cover appliance maintenance in detail if you want deeper insights.
These habits add up. A home that does a quick monthly touch-up never needs to spend an afternoon scrubbing baked-on grime.
Conclusion
Sparkling oven glass is achievable without chemistry knowledge or expensive products. Whether you choose a commercial cleaner for speed or DIY methods for budget and control, the key is matching the approach to your buildup level and tolerance for chemicals. Start with baking soda and vinegar for light to moderate deposits, reach for ammonia for heavy grease, and grab a commercial spray when you want minimal effort. Then, maintain regularly with quick wipe-downs to avoid another months-long battle. Your oven glass will thank you, and you’ll actually be able to see what’s cooking inside.