
A Norcold refrigerator is supposed to keep your perishables cold whether you’re parked at a lakeside campground or dry camping in the desert. When it stops cooling, the entire trip feels compromised, and panic sets in fast. The good news: most Norcold cooling failures stem from fixable issues like thermostat miscalibration, dust-clogged coils, or ventilation blockages. Before you assume the unit is dead and start pricing replacements, work through this troubleshooting checklist. Many RV owners solve the problem themselves in under an hour with basic tools and no special knowledge required.
Table of Contents
ToggleKey Takeaways
- Most Norcold RV refrigerator cooling failures are caused by fixable issues like thermostat miscalibration, dust-clogged coils, or ventilation blockages rather than complete unit failure.
- Start troubleshooting a Norcold refrigerator not cooling by verifying power supply, checking thermostat settings between 3–4, and confirming the unit is in the correct AC or DC mode.
- Clean cooling coils every 6–12 months using a soft brush and compressed air to remove dust, pollen, and debris that restricts heat dissipation and reduces cooling performance.
- Ensure at least 6–12 inches of clearance around the exterior vent opening and check that interior vent dampers are open, as blocked ventilation causes roughly 20% of reported cooling complaints.
- Stop DIY troubleshooting and call a professional RV technician if you encounter propane leaks, refrigerant leaks, compressor failure, or control board issues.
- Most Norcold refrigerator cooling problems can be resolved in under an hour with basic tools and no special knowledge, often costing under $50 in supplies.
Check The Power Supply And Thermostat Settings
Start with the simplest culprits: power and settings. Norcold units run on either 12-volt DC (when the RV engine or batteries are live) or 120-volt AC (when plugged into shore power or a generator). If your fridge is silent and cold isn’t happening, first confirm power is reaching the unit.
Look at the control panel and verify the thermostat dial is set to a cooling position, not the “off” or “warmest” setting. This sounds obvious, but it’s the #1 reason units appear broken after a winter storage. The thermostat on most Norcold models ranges from 1 (coldest) to 5 or 7 (warmest), with “off” at the far left. Turn it to setting 3 or 4 as a baseline.
Next, check whether the refrigerator is in AC or DC mode. Some RVs have a switch on the unit itself or a control panel that selects power source. If you’re plugged into shore power, the unit should be in AC mode. If you’re running on batteries alone, switch to DC. Running on the wrong power source means no cooling, period. Listen for the compressor humming: if you hear nothing, power isn’t flowing.
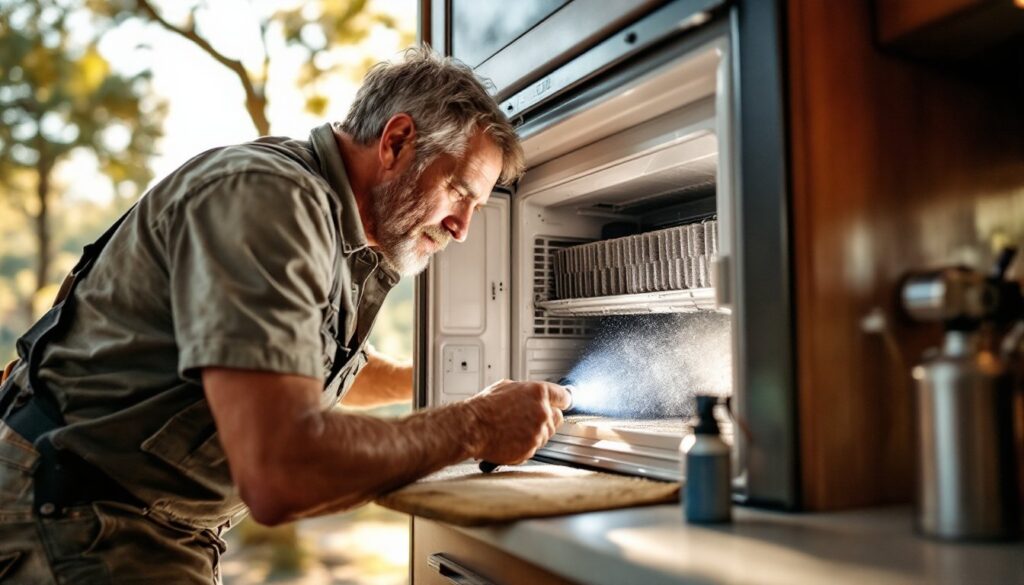
Inspect And Clean The Cooling Coils
Dust and debris are cooling killers. The Norcold’s cooling coils (located at the rear of the unit, behind an exterior access panel) need airflow to work. When they clog with dust, pollen, or bug debris, the refrigerant can’t shed heat, and your ice cream turns to soup.
Pull your RV to a shaded spot and grab a brush, compressed air canister, and gloves. Most Norcold models have a removable exterior panel held by a few screws or bolts. Open it and inspect the coils, they look like a small radiator with fins. If they’re matted with dust, you’ve found your problem.
Gently brush the coils using a soft brush or old toothbrush, working top to bottom. Avoid bending the fins: they’re thin aluminum and damage restricts airflow. Blow compressed air through the fins from front to back to dislodge remaining particles. Pay extra attention to the corners where debris collects. After cleaning, the cooling performance often improves within minutes. Repeat this cleaning every 6–12 months, more often in dusty environments or if the RV sits for extended periods.
Verify Proper Ventilation Around The Unit
Even clean coils won’t cool if the air can’t circulate. The Norcold needs unobstructed ventilation on the exterior side where heat is expelled. Many RV owners park right against a wall, tree, or tarp that blocks the vent opening, inadvertently cooking the unit.
Walk around the RV and locate the refrigerator’s exterior vent opening (usually a grille on the side or back wall). Ensure there’s at least 6–12 inches of clearance on all sides. Move any camping chairs, firewood, gear, or awning that’s pressed against it. In summer months especially, ambient heat buildup around a blocked vent can push interior temperatures above the thermostat’s ability to compensate.
Also check that the interior vent damper (a small flapper inside the RV, just above the fridge) isn’t closed or blocked. Some models have a manual damper you can open to allow warm air to escape from inside the unit. If it’s stuck closed, heat can’t leave, and the compressor works overtime without achieving temperature. Open it fully. These small ventilation fixes resolve roughly 20% of reported cooling complaints.
Test The Heating Element And Gas Ignition
Norcold units designed for three-way operation (12V DC, 120V AC, and propane) have a heating element and igniter that must work in concert. If the heating element fails or the gas line is kinked, the cooling cycle can’t complete on propane mode.
First, ensure propane is flowing to the RV. Check the propane tank gauge and confirm the tank valve (near the exterior tank, usually on the street side) is open. Then move to the Norcold’s exterior access panel. You’ll see copper tubing (the gas line) and a thin wire running to the igniter near the heating element. Look for obvious kinks, pinches, or loose connections.
If everything looks intact, listen closely while the unit is running. You should hear a faint click-click-click from the igniter trying to light the heating element when in propane mode. No clicking usually means the igniter is dead or the circuit isn’t completing. This requires replacing the igniter element or having a technician inspect the control board. For troubleshooting on your own, this is where the DIY road often ends, propane systems carry safety risks if you aren’t certified.
Examine The Thermistor And Control Board
If power is solid, the coils are clean, ventilation is clear, and you’re not hearing igniter clicks, the thermistor (a temperature sensor) or control board may be faulty. The thermistor sits inside the fridge compartment and tells the control board when to activate cooling cycles.
A malfunctioning thermistor sends wrong signals, the control board thinks the fridge is cold when it’s actually warm, so it never engages the compressor. Locate the thermistor probe inside the fridge (it’s a small rod or bulb attached to a thin wire, usually near the thermostat) and inspect it for ice buildup, corrosion, or visible damage. If it’s frozen solid, the fridge is too cold internally: if it’s corroded or cracked, replacement is needed.
Control board failure is less common but happens after years of thermal cycling or moisture exposure. If you’ve ruled out all other causes and the unit still won’t cool, the board likely needs replacement. This is advanced work: most DIYers should stop here and call in a professional. But, family handyman provides step-by-step troubleshooting for RV refrigerators, including guidance on testing thermistors and boards if you want to dig deeper.
When To Call A Professional Technician
Know your limits. If you’ve worked through the checklist above and the fridge still isn’t cooling, it’s time to call an RV technician. Specifically, stop DIY work if you encounter:
- Propane-related issues: Gas leaks, kinked lines, faulty igniters, or failed regulators require a licensed RV service center.
- Refrigerant leaks: A hissing sound or oil residue on the compressor means refrigerant is escaping. The system must be evacuated, the leak sealed, and refrigerant recharged, illegal and dangerous to DIY.
- Compressor problems: If the compressor doesn’t hum even with correct power and settings, it’s likely seized or failed. Rebuilding or replacing it requires specialized equipment.
- Control board replacement: If diagnostics point to a failed board, order the correct part and have a technician install it: improper installation voids warranties.
Professional RV refrigeration technicians typically charge $100–$200 per hour for diagnostics and repair, plus parts. Getting a quote before work begins saves surprises. For complex issues, shipping the unit to a manufacturer-authorized repair center may be more cost-effective than roadside service calls.
Don’t ignore a cooling failure expecting it to resolve itself. Extended warmth inside the fridge risks food spoilage and can damage the refrigerant circuit if the compressor runs continuously trying to meet thermostat demands. Address it quickly, whether through troubleshooting or professional repair.
Conclusion
A non-cooling Norcold refrigerator doesn’t always mean a trip-ruining disaster. Ninety percent of the time, the problem is preventable through basic maintenance, keeping coils clean, ensuring proper ventilation, and checking power settings before departing. Work through the troubleshooting steps methodically: power and thermostat first, then cleaning and ventilation. Only after ruling out these basics should you suspect internal component failure. Most DIY fixes take an afternoon and cost under $50 in supplies. Your future camping trips, and your perishables, will thank you.